The anual Dreamforce event was once again held in San Francisco and again was an amazing event. This year was special for me because it so happened to coincide with the Giants playing in the NLCS during that week and I was lucky enough to see them win in Game 3 on their way to a World Championship.
It also marked the second year for me presenting in the DevZone – this time I choose to talk about the unique approach our team has been using to develop Salesforce1 apps.
I wanted to walk through how this approach really fit well with our team and how we have been leveraging it to develop some really cool apps. This approach is all about the empowering individuals and teams to build apps fast and with modern tools they already know and love.
I had a great time presenting at Dreamforce ‘13. After getting home and having time to reflect on the experience I wanted to do a quick summary of my thoughts.
The Session
I was super excited to talk about unit testing iOS applications – it’s been a really fun topic to learn about the past 6 months. The general topic can be so large it’s hard to condense that down to 45 minutes, so I tried to focus it on what has had the most impact for me lately.
If I could summarize my session it would be this:
Testing doesn’t have to be an afterthought in iOS. Find the tools and frameworks that support efficiency and happiness while using the Magic Tricks of Unit Testing to write tests you will love. We also need to spread the word about testing in iOS!
Questions at the end
I got some really good feedback at the end of my session. Here are couple things we talked about:
API Drift and Mock objects.
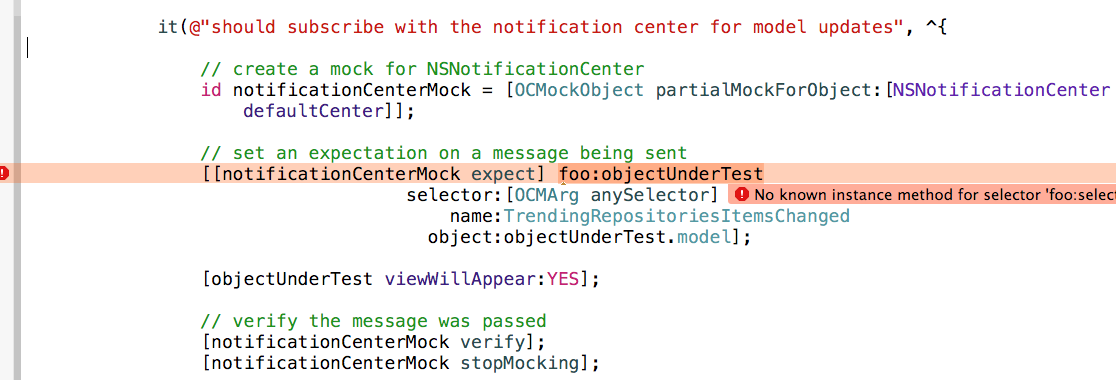
I was asked whether or not using Mock objects can lead to situations where your unit tests pass but the application is broken. This was a great question – It’s true that using mock objects (a form of a Fake) can cause what is known as “API Drift”. API Drift is when your Fake object drifts from the contract of the object it is faking. In these cases you can have tests that seemingly pass while your application is broken.
It’s up to the developer to make sure the fake object honors the contract of the object it is faking. It turns out to be easy with Objective-C and OCMock – the compiler won’t let you stub or mock calls to selectors that don’t exist.
This is one of the great things about the compiled nature of Objective-C. With Ruby you have to usually take another step and say call_original so that if the method doesn’t exist on the real object you fail the test.
Is TDD Possible with iOS?
I was asked whether or not TDD was possible with iOS. My answer is YES! I love TDD – the demo application was created with TDD. Part of this is the tools and frameworks you use to help support TDD – I’d say the biggest one for me has been using AppCode with all of it’s powerful features for refactoring and navigation of a code base.
For the past 6 months I’ve been doing iOS development for Salesforce. Having spent most of my previous time doing JavaScript, Ruby and .NET development I’d gotten used to certain tools to accomplish my daily workflow. This is a quick writeup on the tools I’m currently using to get a similar experience in iOS.
Testing Frameworks
I’m big on unit testing – I mean I love it, and I love TDD. So naturally the tools I use need to support that workflow. I’ve come to really love BDD style unit testing frameworks in Ruby with RSpec and Mocha for JavaScript – so this was the first tool I went looking for.
In the Objective-C community there are several frameworks, that at the surface, offered the BDD style I was looking for:
import"specta.h"SpecBegin(Thing)describe(@"Thing",^{beforeAll(^{// This is run once and only once before all of the examples// in this group and before any beforeEach blocks.});beforeEach(^{// This is run before each example.});it(@"should do stuff",^{// This is an example block. Place your assertions here.});it(@"should do some stuff asynchronously",^AsyncBlock{// Async example blocks need to invoke done() callback.done();});describe(@"Nested examples",^{it(@"should do even more stuff",^{// ...});});pending(@"pending example");afterEach(^{// This is run after each example.});afterAll(^{// This is run once and only once after all of the examples// in this group and after any afterEach blocks.});});SpecEnd
After playing with each of the three I decided to go with Specta and have been really happy with that choice. My criteria was based on:
The ability to easily add the framework to an existing XCode project.
The ability to write asynchronous test cases. Often I’d need to test objects that take block arguments for callbacks – this was a must.
Integration into other mainstream tools. XCTool and XCode are well supported with Specta.
Along with a good BDD style testing framework I wanted to find a matcher library that gave me a more fluent, readable syntax similar to that of RSpec or Chai in JavaScript. Something like:
In unit testing I often make use of an Isolation Library. While these are often referred to as Mock libraries, it’s really just a library for making fake objects on the fly. I primarily need Mock and Stub objects and so far I’ve been using OCMock with good success.
Often with fake objects you want to create Stub objects that are not “strict” – meaning they don’t complain if methods you didn’t explicitly setup are called. One bummer is that with OCMock you must remember to create a “Nice Mock” in order to get that behavior:
Argument constraints are another important feature for Mock objects. OCMock has a decent set of built-in argument constraints, and when the built-in constraints won’t cut it you can reach for a custom predicate constraint via a block you implement:
123
[[mockexpect]someMethod:[OCMArgcheckWithBlock:^BOOL(idvalue){/* return YES if value is ok */}]];
This actually turns out to be the way you can mock calls of methods that take block arguments. In a recent project we had an API Client object that used AFNetworking to implement it’s HTTP communication. Each method call would take a callback for when that communication completed. For unit tests that needed to Stub or Mock this interaction I used the following approach:
12345678910
// stub out the call to doAPIWork and callback with an error condition[[clientstub]doAPIWorkcallback:[OCMArgcheckWithBlock:^BOOL(idparam){// cast the param to our block typevoid(^passedBlock)(NSArray*,NSError*)=param;// call the passed block back with our stubbed responsepassedBlock(nil,[NSErrorerrorWithDomain:@""code:500userInfo:@{}]);// indicate that the argument was fine to OCMockreturnYES;}]];
That being said – I’m would encourage others to also evaluate OCMockito from Jon Reid. Some key differences are:
Mock objects are always “nice,” recording their calls instead of throwing exceptions about unspecified invocations. This makes tests less fragile.
No expect-run-verify, making tests more readable. Mock objects record their calls, then you verify the methods you want.
Verification failures are reported as unit test failures, identifying specific lines instead of throwing exceptions. This makes it easier to identify failures.
Test Runner
Writing tests is important, but equally important is running those tests to get feedback and to quickly iterate during development. For running tests I’ve been making heavy use of XCTool. XCTool is a tool for building and testing your application at the command line. This was big not only for those who prefer that local development environment but for running the tests during Continuous Integration on a remote server.
One thing I quickly added to our project was XCTool’s ability to have default arguments passed to the command by having a .xctool-args file in the root of your project.
With that you can easily run your tests by running $xctool test
Better yet – for those who like to practice TDD you can combine XCTool with the power of Guard so that you tests will automatically run when you make changes to any of your project source files. An easy way to get started with this is to use the guar-xctool-test gem from Francis Chong.
AppCode
I’ve been using AppCode over XCode for a little while now. This was mainly because I had become so used to the features of JetBrains IDE’s over the years it was hard to go back. I’ve used their products for developing Java with IntelliJ, Ruby with RubyMine, JavaScript with WebStorm and .NET with ReSharper. Features like refactoring, code analysis and source navigation make it at least worth a try.
The tools you use are really a personal preference – These are mine. As I’m sure you already know these are not the only options out there. I encourage you to find the tools that make you productive and happy.
One of the things I’ve always been driven to in software development is having a
codebase that is easily tested and where test execution is easy and
integrated well into the development workflow. As the majority of my time has been
spent writing JavaScript and less server-side code I’ve been trying
different approaches to writing testable JavaScript code and
incorporating the same proven practices of continuous integration and
test-driven development into my workflow.
The goal of this post is to discuss the various
options that are out there for easily running and incorporating your
JavaScript suite into the development workflow. A lot of discussion in the community has taken place in terms on improving the toolchain of developing JavaScript and building and
running a solid test suite is an integral piece to that.
Browser-Based Test Runner
Most frameworks have html based runners. These are fine to get
started as they provide a good way to run your test suite in a browser
of your choice. As we will
see later other options will use this as the main method of running the
suite in an automated fashion.
Let’s look at some examples. All popular testing frameworks include a browser-based
test runner:
Easy – This is by far the easiest option to get started with. Simply
use the included html runner in your test framework and visit the page
in your browser of choice.
Representative – This option does a good job at proving your tests are
reflective of an actual browser environment. It may only represent one
of the browser environments you may wish to target, but we’ll explore
other options to help with this issue.
Cons
Slower – In comparison to other options it can be slower to load up a
browser and visit the runner page.
Harder to automate – While it may be possible to automate the process
of running the suite through a real browser it’s not as easy as some
of the other approaches.
Requires the developer to host and to open the runner in the browser,
instead of a simple command or something built into your build process.
Headless Browser-Based Test Runner
This is a variation of our first option. The idea is to use a “headless” browser to
load and parse the browser-based test runner. The difference is that you
don’t incur the cost of loading an entire browser, but it means that you
must use a script to parse and display the results of the browser-based
runner.
Several headless browsers are available:
PhantomJS – Headless Webkit with a JavaScript
API based on QTWebKit.
Zombie.js – Insanely fast, headless full-stack
testing using Node.js.
This seems to be the option that is gaining the most popularity amongst developers. Several
projects are using this approach:
Fast – Spinning up a headless browser is generally faster than using
a fully fledged browser.
Easy automated – The process of spinning up the headless browser
can easily be scripted to run as part of your local development cycle
or as part of your continuous integration cycle on a remote machine.
Cons
The parsing code must be written to transform the browser runner to
the command line output. This component may already exist based on the
test framework you are using. For example, QUnit includes a runner for PhantomJS.
Any features offered by the framework must be extracted from the
html output of the browser-based runner. For example, timings or
stack traces for failures. Again, this may not be an issue unless you
are writing the parsing code.
Not represntative – The validity of the results really only indicates that your tests pass
on the JavaScript engine of the headless browser, not a browser that
your end users would use. As we’ll see there are other approaches that mitigate this downside.
DOM Emulation in Node.js
This approach is an interesting one. While some testing frameworks
already support testing JavaScript running under node.js you can
incorporate a W3C DOM implementation into node so that tests cases that
need a DOM can run along side those that don’t. This approach isn’t talked about as much in the
community but I find it to be a nice hybrid approach for testing locally
and as a first pass test with continuous integration.
A bootstrapping script that imports the right node modules and test
suites.
Pros
Fast – Similar to the “Headless” testing approach these tests run
fast.
Native – No reason to write and maintain parsing code that extracts the testing
frameworks output. Instead use a testing framework that natively
supports running tests under node.js and add DOM support where needed.
Easily automated – Just like the “Headless” testing approach node.js
is easily integrated into normal developer workflow via the command
line or on a server running your continuous integration process.
Cons
Not representative – Again, like the “headless” approach these tests
really only validate your suite against JSDom’s W3C DOM implementation – not
against any real browsers that your end users may use.
Browser Automation
Another good approach is to automate one or more real browsers that
run your test framework’s built-in runner. This is conceptually
similar to the first approach, except you use the help of a tool to automate
running the test in one or more browsers. This approach can be run locally in your development workflow, or
using a cloud-based service. There are several interesting projects
that help you with this approach:
Yeti – A command-line tool for launching JavaScript
unit tests in one or more browsers and reporting results. Currently
only supports tests written in YUI Test.
Bunyip – An effort to combine
BrowserStack and Yeti for cross browser testing as well as add support for other testing frameworks like Jasmine.
Testacular – Another
command-line tool for launching JavaScript tests in one or more
browsers as well as headless browsers. Relatively new at time of
writing, but it has some interesting features.
BrowserStack – Provides browser-as-a-service for automated cross-browser testing. Because it is just an API for spinning up new browsers it is usually combined with another tool like Bunyip that needs browser instances to work. In fact, the JQuery project uses the combination of Test Swarm and BrowserStack to do it’s cross-browser testing.
Testling – A cross-browser testing platform
that has an web API to allow running your tests in the cloud
on various real browsers as well as locally using JSDom. Testling provides an
integrated testing framework, but adapters to other frameworks can be created as well.
Pros
Representative – Yours tests are run in a variety of real browsers, potentially event against a variety of devices, giving you more confidence in your test results. Unfortunately nothing can truly replace the experience of running actual code in a real browser.
Flexible – Some of the tools provide a way to run your tests locally
using something like JSDom or PhantomJS, but then also in the cloud
against real browsers.
Cons
Complexity – Because of the fact that you are automating one or more
browsers which have anomalies and can sometimes be fragile the
overall solution is more complex than some of the other approaches.
Setup Time – Depending on the library and tools used it may require
more of an investment of time to get get up and running.
Cost – Cloud-based services are not free but are relatively
inexpensive.
While there are many options out there it really comes down to your
testing goals. Choosing a tool that is flexible and that can run in
multiple ways is the best choice as it allows you to adapt as your
needs change.
JSDom is a JavaScript implementation of the W3C DOM on Node.js. For our use case it proved to be a good solution to running unit tests that
required the DOM.
A simple npm install jsdom installed jsdom just fine on *nix
systems but we needed it working on both *nix and Windows. Installing it on Windows required a few
additional prerequisites. At the time several google searches unturned
good tips, but none of them worked fully for us. This is an attempt at a
complete picture of the issues and solutions.The issues discussed here may change as node progresses as it has
changed several times in the recent past.
The main issue at time of writing is that jsdom in turn requires a node module called contextify. Contextify
requires a C++ addon, which must be built for the given platform. The
way node builds these native addons is the build tool node-gyp.
Prerequisites
Node.js (at writing time using 0.6.19) and NPM (1.1.24). These are
packaged together when using the Windows installer
Note: That my initial tests using node 0.8.0 and npm (1.1.32) also
worked the same.
Python: Node-gyp currently recommends 2.7.x
Add python to your PATH
Add a new environment variable PYTHON=C:\path_to_python\python.exe
This wasn’t listed in the node-gyp instructions but based on the output of the script it seemed necessary.
Microsoft Visual C++. The express version works as a free
alternative.
Installing
Once these prerequisites are installed jsdom is installed just like any
other module via:
1
npm install jsdom
You should see output from node-gyp and then msbuild being invoked to compile the native module. In our experience
msbuild would output a warning that was safe to ignore:
1
MSB8012: TargetExt (.dll) does not match the Linker's OutputFile property value (.node)
One of the other issues we had was finding a good, simple example to do a sanity check
to make sure things were installed correctly. We found that the best example seemed to be the one from the site that
loaded JQuery via a CDN and listed the links from Hacker News.
I’m working on a related blog post about our JavaScript testing strategy
and how we are using tools like Mocha, JSDom and others to write a
test-driven web application.
I thought it would appropriate to remember Dr. Martin Luther King Jr
with a quote. Today I am appreciative of his and others sacrifice.
I have a dream that my four little children will one day live in a nation where they will not be judged by the color of their skin but by the content of their character.
A quick note on using vendor-specific properties: when doing so it is
generally a good idea to include the non-prefixed property as well, after all of
the prefixed versions.
This will ensure that when the time comes and the browser supports the
property entirely it will be used. It will also override the prefixed version when that time comes.
I like this quote from the JavaScript Patterns book
Another reason why the literal is the preferred pattern for object creation is that it emphasizes that objects are simply mutable hashes and not something that needs to be baked from a “recipe” (from a class).
Prototype
JavaScript objects are all linked to a prototype object where it can
inherit properties. This is important for code-reuse patterns discussed
later. Object literals are linked to the Object.prototype by default.
Functions
Functions are first class objects. They can be passed around as values
or augmented with properties and methods
Provide local scope. Declarations of local variables get hoisted to
the top of local scope.
Syntax for creating functions
Named function expressions
123
varadd=functionadd(a,b){returna+b;}
Anonymous functions. Same as above but without a name:
123
varadd=function(a,b){returna+b;}
Function Declarations:
123
functionadd(a,b){returna+b;}
Invocation
When a function is invoked it’s passed the declared parameters and two
additional ones:
a reference to this
a reference to arguments
The reference to this depends on how the function was invoked.
Method Invocation
When a function is a property of an object, it is refered to as a
method. When a method is invoked this refers to the containing object.
When new is not used this inside the constructor will refer to the global object instead of the object itself. So a helpful pattern is to enforce the use of new with a self-invoking contructor
123456789
varPerson=function(name){if(!(thisinstanceofarguments.callee)){returnnewarguments.callee();}this.name=name;this.say=function(){return"My name is "+this.name;};}
Scope
Scope is determined by functions, not by blocks in JavaScript.
Parameters and variables defined in a function are not visible outside
of that function. Also, variables declared inside a function are visible
anywhere within it – One interesting case is when an
inner function has a longer lifetime than its outer function.
Immediate Functions
A pattern that wraps a function and immediately executes it. It helps
avoid poluting the global namespace and also creates a closure,
protecting private variables.
Reusing code is an important topic to any discussion of software
development. In classical languages this is usually done with
inheritance. JavaScript supports many different ways in which code can
be reused. I like this quote from JavaScript: The Good Parts when
thinking about how JavaScript differs from other languages:
In classical languages, objects are instances of classes, and a class
can inherit from another class. JavaScript is a prototypal language,
which means that objects inherit directly from other objects
The most natural inheritance pattern is to embrace the prototypal behavior
and focus on objects inheriting properties of other objects.
Prototypal inheritance is easy with the Object.create method in
ECMAScript 5:
This method is easy to pollyfil in environments that don’t support it
natively:
12345678910
if(!Object.create){Object.create=function(o){if(arguments.length>1){thrownewError('Object.create implementation only accepts the first parameter.');}functionF(){}F.prototype=o;returnnewF();};}
Another approach to code-reuse to the apply psuedoclassical patterns
of inheritance to JavaScript. The most straight forward and versitile way
is called the Proxy Constructor Pattern. The idea is to have the child
prototype point at a proxy object that in turn is linked to the parent
via it’s prototype.
varKlass=function(Parent,props){varChild,F,i;// create a constructor functionChild=function(){if(Child.parent&&Child.parent.hasOwnProperty('initialize')){Child.parent.initialize.apply(this,arguments);}if(Child.prototype.hasOwnProperty('initialize')){Child.prototype.initialize.apply(this,arguments);}};// inherit via the proxy prototype patternParent=Parent||Object;F=function(){};F.prototype=Parent.prototype;Child.prototype=newF();Child.parent=Parent.prototype;Child.prototype.constructor=Child;// copy propertiesfor(iinprops){if(props.hasOwnProperty(i)){Child.prototype[i]=props[i];}}returnChild;};
It can then be used like:
12345678910111213141516
varMan=Klass(null,{initialize:function(name){this.name=name;},getName:function(){returnthis.name;}});varSuperHuman=Klass(Man,{initialize:function(){},getName:function(){varname=SuperHuman.parent.getName.call(this);return"I am "+name;}});
Another pattern in code-reuse is the concept of borrowing methods. In
cases where it doesn’t make sense to inherit all of the properties you
can just borrow the ones you need:
1
notmyobj.dostuff.apply(myobj,[params]);
Global Variables
It’s a good idea to minimize the number of global variables in a
JavaScript application. The main reason is because of naming collisions
between code bases. If two seperate code bases declare global variables
with the same name unintended consequences are often a result.
Two main features of javascript as a language
make the issue easier to create:
Not having to declare variables before using them
Implied globals – any variable you don’t declare becomes a property
of the global object
ES5 strict mode will throw an error if assignments are made to implied globals
The easiest way to avoid global variables is to always declare variables
with the var keyword.